Antique Chair Styles: Legs, Backs, Joinery, and Wood Clues
Antique chair styles explained through visible clues: legs, backs, joinery, wood, and wear patterns to help you narrow dates and origins from photos.
Quick answer for antique chair styles
Antique chair styles are best approached as a set of visible clues rather than single proofs. Leg shapes (for example, cabriole vs. turned), the character of the back (ladderback, slat, splat, or Windsor), and how the parts join together are the strongest photo-surviving signals for era and origin.
Look first for construction evidence you can capture with a phone: pegged mortise-and-tenon joints, hand-cut tool marks, hand-forged or irregular nails, and seat-pan undersides. These items survive lighting and perspective better than finish color or upholstery, and they tell you whether a chair was hand-built or machine-made.
Wood species and end-grain clues narrow region and workshop practices: quarter-sawn oak rings, wide crotch mahogany boards, or a distinctive burl veneer are all helpful. Combine those material clues with wear patterns—seat compression, arm-rest shine, and repaired joints—to form a plausible date range rather than a single-year claim.
Treat any single photo as a starting point. If the visible clues align with a known style family (for example Queen Anne cabriole legs + shell carving), you can narrow possibilities. If clues conflict—modern screws in a hand-carved frame, or a mahogany veneer over machine-cut joints—expect later repair or a composite piece.
Strongest visual clues
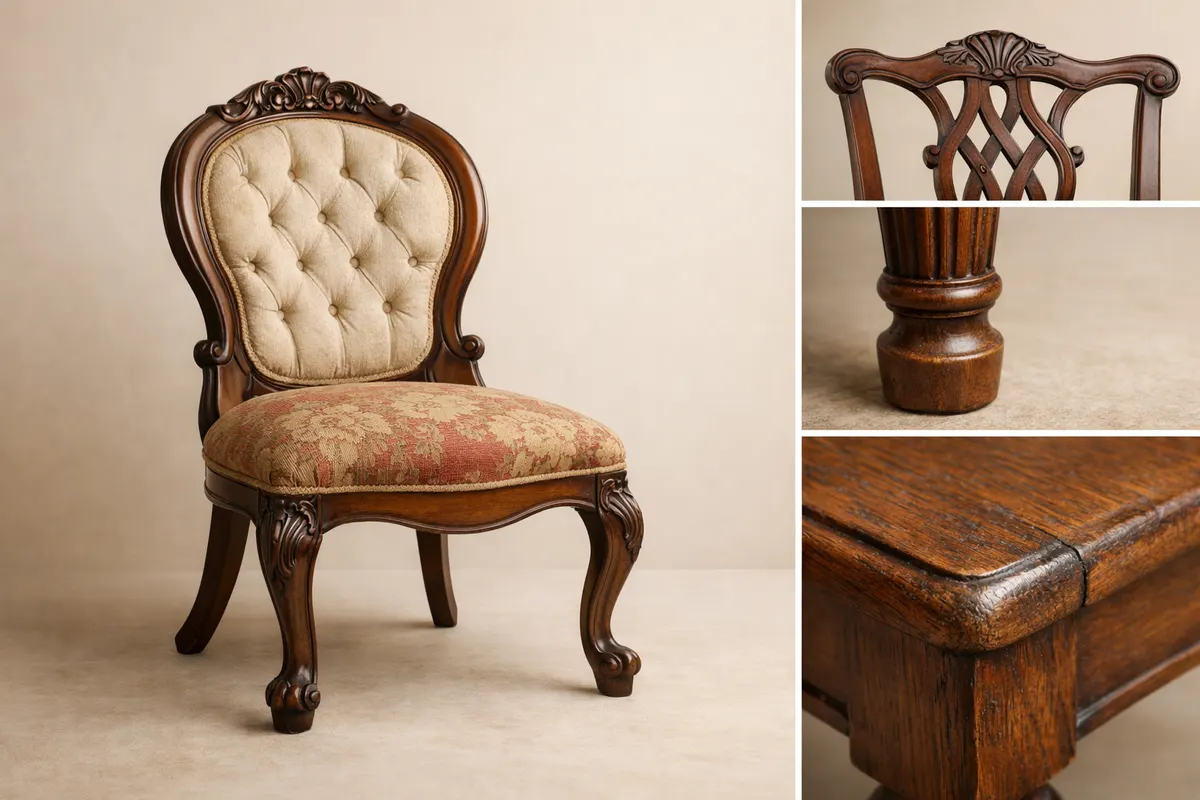
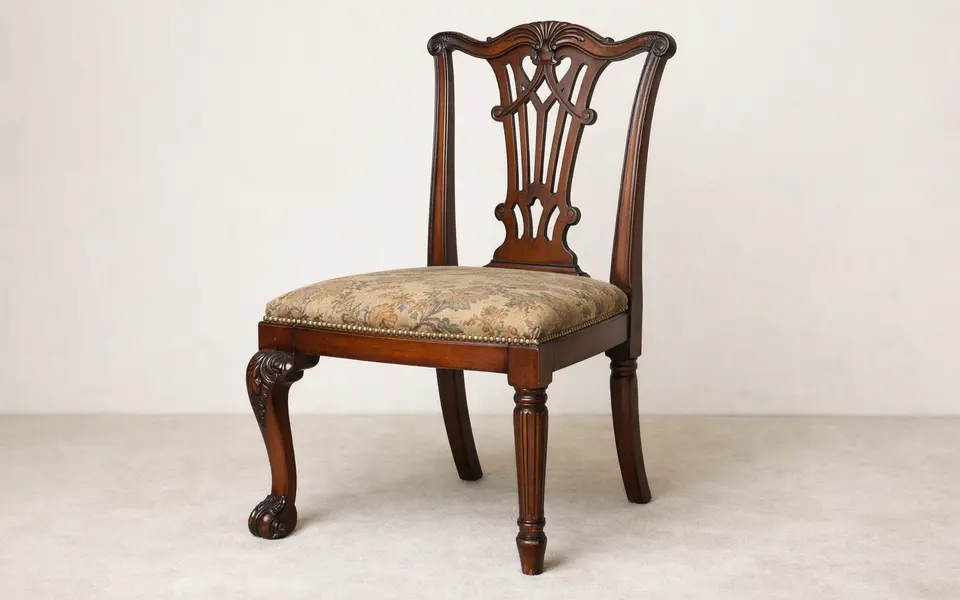
Leg form and feet are high-value clues because they are style-defining and often survive damage or re-finishing. Cabriole legs with pad or club feet point to 18th-century English and American forms (Queen Anne, early Georgian). Turned legs with consistent lathe marks and repetitive patterns are typical of 18th–19th century chairs where spindle turning was common; perfectly identical turnings suggest machine tooling and a later date.
Joinery type is the most durable construction clue. Pegged mortise-and-tenon joints (wooden pegs driven through tenons) usually indicate hand-fitting and pre-19th-century practice in many regions; machine-cut joints and regular, identical mortises suggest later factory work. Tight, hand-cut dovetails (where visible in stretchers or related components) and tapered pegs differ from modern staples, glue blocks, or sheet-metal brackets.
Back design and slat treatment narrow style families. A single carved splat back with a vase shape is a classic indicator of Chippendale influence; multi-slatted Windsor backs (rounded hoop shaped) point to a specific English colonial production method and often to pine seats with turned legs. Ladderback chairs with flat slats and large hand-forged nails in the joints are a rural, early form that survives into vernacular 19th-century furniture.
Wood and veneer clues are reliable when you can see end grain or the underside. Quarter-sawn oak shows medullary rays and tight, straight grain used in Arts & Crafts and late-17th to 19th-century oak work. Large-width mahogany boards, color, and figuring suggest higher-quality cabinet work; look at underside and drawers for original surfaces and old glue residue rather than later plywood.
Wear patterns and repair evidence confirm age and use. Seat collapse, smoothed arm cresting, shrinkage gaps at joints, and old peg repairs indicate genuine long-term use. New screw heads, fresh glue smells, or modern staples are clear signs of repair or later assembly and should temper any claims about original construction.
- Leg profile and feet: cabriole, turned, spool, splayed, bun, pad, or claw-and-ball.
- Joinery: pegged mortise-and-tenon, hand-cut dovetails, machine-cut joints, presence of glue blocks or staples.
- Back type: splat, ladderback, Windsor, slat/stick-back, balloon or spoon-back shapes.
- Wood clues: quarter-sawn oak rays, mahogany crotch veneers, end-grain visibility, sapwood width.
- Wear & repair: old pegs, compression of seat, consistent surface wear vs. spotty restoration.
Weak signals
Color alone is a poor age indicator. Finish color changes with exposure, re-staining, or modern lacquer; a darkened surface may be shellac or modern toner. Photographs exaggerate warmth or coolness depending on white balance and lighting, so do not rely on tone as proof of age.
Upholstery and seat coverings are frequently replaced and hide critical clues. A period frame with Victorian upholstery might look Victorian at a glance, while an 18th-century frame could wear 20th-century fabric. Always check inside the seat pan and under any fabric for original webbing, stuffing (horsehair vs. modern foam), tacks, or machine staples.
High-gloss surfaces, uniform tool marks, or repetitive carving patterns can be deceptive: skilled modern reproductions copy historical profiles precisely. Similarly, surface dirt, chemical darkening, or faux-patina finishes are easy to add and hard to separate from genuine age in a single photo.
Single-angle photos and lack of context reduce confidence. A front-on image of a decorative back shows style but hides joint type; a top-down shot hides leg joinery. If a photo misses undersides, tenons, or ends of rails, treat any identification as tentative until more evidence is captured.
Comparison workflow
Start by cataloging the visible clues you can photograph: leg type and feet, back form, joinery detail, visible screw or nail heads, wood grain close-ups, and signs of wear or old repairs. Treat each clue as one line of evidence rather than a full match on its own.
Next, assemble candidate style families that match multiple clues. For example, a chair with cabriole legs, a carved vase splat, and pegged joints narrows candidates to early Georgian/Queen Anne-derived pieces; a chair with turned spindles, hoop back, and a saddle seat aligns with Windsor types. Eliminate styles that conflict with core construction clues—matching silhouette with modern joinery is likely a later reproduction.
Compare details across multiple photos or sources: look at underside joinery against published examples, check screw and nail types against known historical timelines (cut nails, wire nails, slotted screws), and compare veneer patterns with dated cabinet work. Keep an eye out for replacement parts—turned legs can be swapped, and entire backs are sometimes replaced during restoration.
Create a short provenance note for each candidate: likely date range, probable region, and confidence level. Note what additional photos or checks would increase confidence—clear images of tenon shoulders, pegs, saw marks on end grain, and maker’s stamps are high-value next steps. If you need a structured primer, consult an established step-by-step guide on identifying furniture from images to help arrange the evidence and avoid common pitfalls.
- Photograph checklist: overall front, back, close-ups of leg bases, underside of seat, joints, screw/nail heads, and any maker marks.
- Match at least three independent clues (form, joinery, wood) before assigning a narrow style label.
- Document suspected repairs: mismatched wood, modern hardware, or fresh glue should lower confidence.
- Record a two-line hypothesis: probable style/era, region, and confidence level (low/medium/high).
App workflow
After you collect the visible clues and assemble your comparison notes, use the Antique Identifier app as a first-pass research tool. Open the app on your phone, import or photograph the views you prioritized—especially the underside and tight joint shots—and treat the app’s matches as candidate leads rather than final answers.
Interpret app results against your checklist: does the app’s suggested style family match the joinery and leg profile you documented? If the app highlights example images that align with pegged joints, similar wood grain, and consistent wear, that raises confidence. If app results conflict with clear construction evidence (for example, suggesting an 18th-century origin while you see machine-cut mortises), lean on the physical clues.
Use the app’s suggested matches to guide targeted follow-ups: seek maker stamps the app points to, or check auction archives and museum catalogs for the same specific back or leg profile. Keep a research note with the app suggestions and your photographed evidence; curating these notes makes it easier to present a concise packet to a local specialist if verification is needed.
Try Antique Identifier as a first-pass after checking clues
Capture close-up photos of joints, leg profiles, underside rails, and any marks, then run those images through the Antique Identifier iOS app as a research tool. Treat results as candidate leads—compare them to your documented clues and note inconsistencies before seeking professional verification.
Frequently asked questions
How can I tell if a chair is genuinely 18th or 19th century from photos?
Focus on construction and tool marks visible in photos: pegged mortise-and-tenon joints, hand-cut dovetails, hand-forged nails and irregular fasteners point to older work. Leg form and back type help place a chair within style families. If you see consistent machine-cut joints, modern screws, or plywood, treat the piece as later or heavily restored.
What joinery details should I photograph to help identify a chair?
Photograph the underside of the seat, the end grain at rail ends, any exposed tenons, peg holes or pegs, and the inside faces of rails where joints meet. Close-ups of nail or screw heads also help—cut nails and slotted screws age differently than modern wire nails and Phillips screws.
Can wood type alone identify where a chair was made?
Wood species provide useful context but rarely pinpoint a maker alone. Oak, walnut, and mahogany were widely traded; however, quarter-sawn oak suggests certain production choices, and crotch mahogany veneers suggest higher-end cabinetmaking. Combine wood clues with joinery and stylistic form to get a more specific origin hypothesis.
How do I spot a reproduction or a heavily restored chair in photos?
Look for mismatched patina, fresh tool marks or new screw types, repetitive carving that lacks slight irregularities, and synthetic materials in hidden areas (modern staples, foam). New glue residue, perfectly uniform turnings, or modern upholstery techniques are common signs that a chair is a reproduction or has had substantial later work.