How to Identify Antique Furniture From a Photo: Wood, Joinery, Hardware, and Style Clues
Learn how to identify antique furniture from photo using wood, joinery, hardware, and style clues plus a simple photo checklist and safe next steps.
Quick answer for identify antique furniture from photo
A good photo can often narrow what a piece of furniture is — approximate era range, likely construction methods, and style family — but it rarely proves exact age, value, or authenticity by itself. When you identify antique furniture from photo, prioritize visible construction details: joinery, fasteners, tool marks, and the way wood and veneer are joined. Those clues change far less with cleaning or refinishing than surface color or decoration.
Look first for how parts are held together. Hand-cut dovetails, pegged mortise-and-tenon joints, square-cut nails and early machine screws point to older manufacture; uniform machine-made joints, modern staples, or new plywood indicate later production or repair. Hardware and finishes provide corroborating evidence: the type of screw head, cast brass pattern, or shellac crazing can move a date range forward or backward.
A single photo can be very helpful if it shows several corroborating clues. The more distinct and multiple the clues (e. g. , hand-cut dovetails plus a maker's stamp inside a drawer), the stronger the ID. Conversely, a painted, heavily repaired, or poorly lit single-angle photo will leave major uncertainties — in those cases the photograph is a starting point, not a final verdict.
- Photo strengths: joinery, fasteners, wood grain pattern, maker marks, tool marks, patina and wear.
- Photo limits: exact year, provenance, precise market value, or hidden repairs beneath finishes.
Photo checklist
Take a consistent set of shots so you can cross-check clues. For identify antique furniture from photo, capture the whole piece for context, then systematic close-ups: joints, underside, inside drawers, hinges, back boards, labels, and any unusual repairs. Use a neutral, diffuse light — window light or soft LED — to avoid blown highlights that hide grain and tool marks.
Include a scale reference in at least one shot: a ruler, tape measure, or a standard sheet of paper positioned near a detail. Photograph hardware both in situ and removed if possible — screws and back-of-brass details can tell a different story than the faceplate. For veneers or tops, take oblique light across the surface to reveal seam lines and pattern matches.
Label images as you shoot: front, back, underside, drawer interior, left leg, top edge, maker mark. If you’ll use the Antique Identifier app on iOS, keep the original high-resolution photos on your phone and avoid aggressive cropping until you’ve archived the full images. Finally, note context: where the piece came from, any known repairs, and whether pieces in the set share identical construction.
- Full-frame shot for scale and style context (one per piece).
- Close-ups: joinery (corners, drawer dovetails), underside/backs, drawer bottoms, hinge screws, and maker marks.
- Detail shots under oblique light for veneer seams and tool marks.
- Include a ruler or common object for scale; keep originals at full resolution.
Visual clues
Joinery is the single most reliable visual clue you can capture in a photo. Hand-cut dovetails are often uneven, with varied pin and tail thickness and slightly angled cuts; they suggest pre-1870–1900 manufacture depending on region. Machine-cut dovetails or very regular spacing typically indicate later 19th century or 20th century production. Mortise-and-tenon joints with wooden pegs are common in older chairs and tables; look for round peg heads and pegging visible at tenon shoulders.
Fasteners and nails reveal manufacturing eras. Cut nails (square, tapered) generally date before the 1880s; wire nails and round-headed nails appear later. Screws tell a similar story: early screws have irregular, slotted heads and tapered shanks; later standardized machine screws have uniform threads and heads. Look at the screw slots and heads in hardware close-ups: hand-filed slots, off-center heads, or square-section shanks indicate hand work.
Wood and veneer details help refine style and geography. Quarter-sawn oak with medullary fleck often links to Arts & Crafts and some 19th-century English and American pieces. Book-matched veneers, intricate banding, and figured maples or mahogany point to higher-style periods where veneer work was common. Surface wear patterns — rubbed edges, patinated handles, oxidation in recesses — indicate long-term use in original positions, which supports age authenticity but can be mimicked by skilled restorers.
- Look for hand-cut vs machine-cut dovetails and pegged tenons.
- Note nails and screw types: cut nails vs wire nails; tapered vs machine screws.
- Inspect veneer seams, book-matching, and wood figure under oblique light.
- Observe wear that suggests authentic use: inside drawer wear, oxidation in corners, consistent grime in crevices.
Examples by type
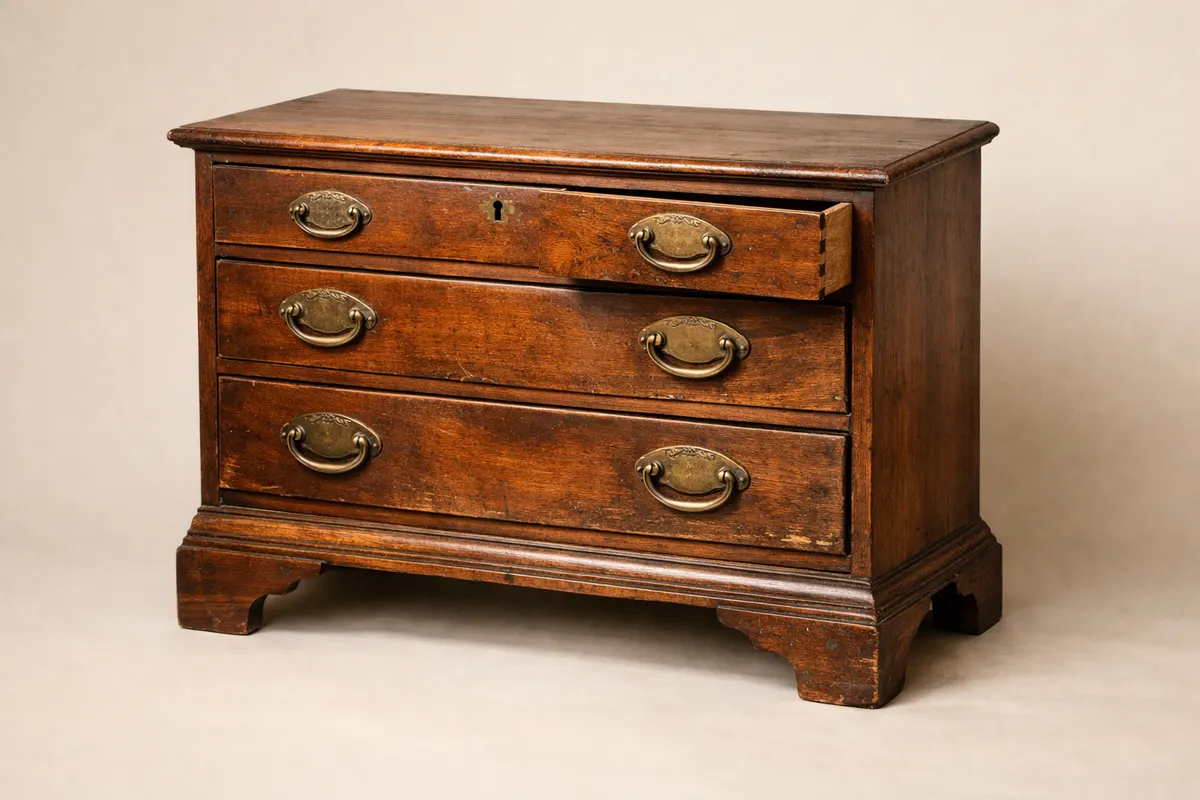
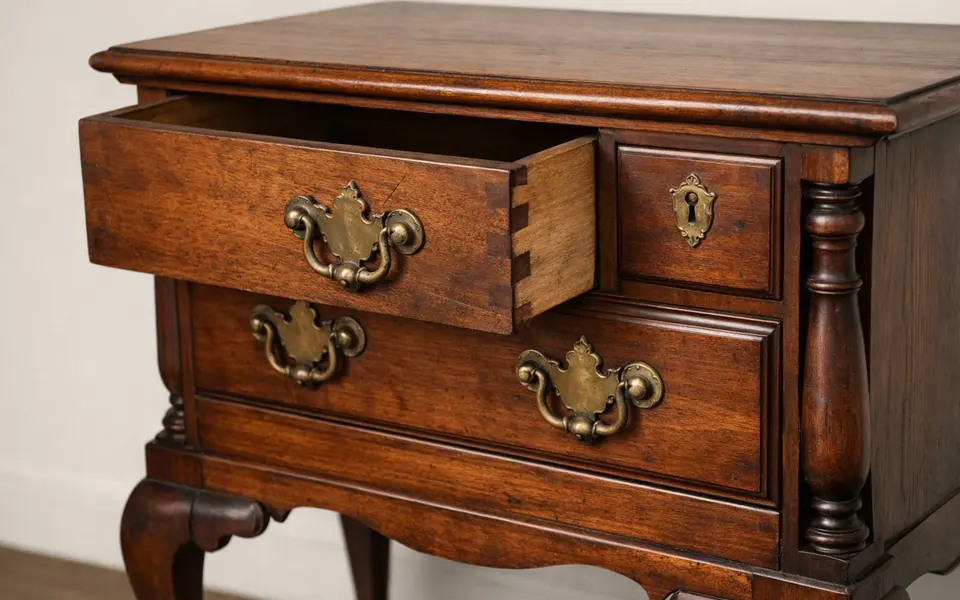
Chest of drawers: Open a drawer and photograph the dovetail joint where the side meets the front. Hand-cut dovetails with irregular pins and wide tails suggest 18th–mid-19th century construction; perfectly regular, machine-made dovetails indicate later production. Check drawer bottoms: early bottoms are single boards fitted into grooves and often show saw marks; later drawers use pre-cut sheet panels or plywood.
Tables and chairs: Legs and stretchers tell a lot. Turned legs show lathe tool marks — look for faint concentric lines visible in a close-up. Square or chamfered tenons pegged through stretchers indicate traditional joinery. For chairs, spindles shaped by hand have slightly varying profiles between each spindle; factory-turned spindles are highly regular and identical.
Case furniture and veneers: A high-style veneer pattern, like veneer book-matching or cross-banding, is common in 18th–19th century dressers, sideboards, and desks. Photograph the edge of the top and underside of the veneer to show whether veneer has an old seam or a modern glued edge. Also look for inlaid or applied moldings; hand-cut inlay edges are rarely perfectly uniform.
- Chest of drawers: dovetails, drawer bottoms, saw marks, and brasses.
- Tables/chairs: leg turning marks, pegged joints, and underside construction.
- Veneered case pieces: seam matching, banding, and inlay edge quality.
Compare likely matches
Separating close matches means stacking clues: don't decide between two styles based on appearance alone — compare joinery, fasteners, and finish together. For example, an American Federal-style chest and a later revival piece may share similar drawer proportions. If the chest shows hand-cut dovetails, hand-planed drawer interiors, and oxidized brass with old solder, lean toward an earlier date. If the same chest has perfectly regular machine-made dovetails, modern screws, and veneer over a plywood substrate, treat it as a later reproduction.
Consider regional and economic indicators at once. Small differences like the use of local hardwoods versus imported mahogany can signal geography and class. An Empire-style piece made from local softwood with cheap applied veneer is likely a vernacular interpretation rather than an original high-style import. Photos of the back and underside will often reveal cheaper construction choices used for lower-cost production.
Use negative evidence as well: missing original brasses, replaced drawer fronts, or a modern finish applied over older wood will complicate a match. When two possible matches remain viable, identify the single testable detail that would separate them — e. g. , a maker’s stamp inside a drawer, the presence of cut nails beneath a drawer bottom, or a pegged tenon inside a leg mortise — and target that area for another photo.
- Stack clues: joinery + fasteners + wood + hardware = stronger ID.
- Compare finish and underside construction to rule out modern repairs.
- Target a single discriminating detail (maker mark, nail type, pegged tenon) to separate close matches.
Common mistakes
Relying on color alone is misleading. Finishes change dramatically with light, cleaning, and refinishing. A dark surface could be an original aged patina or later stain; always check construction and hidden areas where original surfaces are more likely to remain intact. Similarly, assuming ornate carving equals great age ignores revivals and reproductions that imitate carving styles with modern tools.
Misreading replacement hardware or repairs: hardware is often the first thing to be replaced and can give a false impression of age. Photograph the screws behind plates and the inside of mounting holes to see if they match the period suggested by the visible faceplates. Repairs often use different grain or newer fasteners; seams with modern glue residue or staple marks point to later work.
Over-interpreting stamped labels and paper: a paper label can be original or a later dealer tag. Labels glued over old surfaces may be more recent. If a label is suspiciously fresh or applied only to a cleaned area, treat it cautiously. Always corroborate labels with physical construction details and provenance records when available.
- Don’t date by color or surface finish alone.
- Check behind hardware and inside drawers for original fasteners.
- Treat labels and stickers as supporting, not conclusive, evidence.
App workflow
Use the app as a first-pass research tool after you’ve taken the recommended photos. Start with the full-frame shot and upload or scan the close-ups in the app so its image-recognition suggestions can match visible features such as dovetail shapes, screw heads, and veneer patterns. Label each photo with what it shows (e. g. , 'drawer dovetail left') so automated suggestions are easier to verify.
Treat any app matches as hypotheses to test, not final answers. When the app suggests a likely style or period, follow up by photographing the specific discriminating areas it flagged — often the underside of the top, the back of drawers, or the inside of doors — and compare those new photos with known examples in books or museum collections.
If you plan to use Antique Identifier on iOS, keep these photos organized on your phone and note anything you already know about the piece: provenance, previous owners, or past restorations. Use the app’s result list to generate targeted follow-up photos and to record which clues support or contradict each suggested match.
- Start with labeled, full-resolution photos: front, back, underside, hardware, joinery, maker marks.
- Use app suggestions as hypotheses; retake targeted photos of discriminating details.
- Keep notes about provenance and repairs alongside your photos for future reference.
Next steps by confidence level
High-confidence match: If multiple independent clues line up (e. g. , hand-cut dovetails, consistent old patina, and a leg stamp or label), document them. Photograph each corroborating detail and catalogue serial numbers or maker marks. Research similar pieces in auction catalogs and museum collections and build provenance notes. If the piece might be valuable, consider seeking a written condition report or conservation estimate before any sale or restoration.
Partial match: If you have some but not all clues — for example, correct joinery but replaced hardware — gather more targeted photos: the back of the hardware, the screw types, the inside of drawers, and the underside of the case. Use those photos to refine searches or submit the set to an expert forum or the app for another pass. When possible, ask the owner for provenance details: where and when it was acquired, previous repairs, or family history.
Low-confidence or uncertain: When photos show obscured joints, heavy repainting, or signs of extensive repair, avoid definitive claims. Seek a hands-on inspection from a local conservator, a qualified antiques dealer, or a museum curator for a written opinion. For related object types you encounter while researching, such as glassware that might accompany a piece, consult specialized guides like Antique Glassware Identification to avoid conflating different dating methods.
- High confidence: document and research provenance; get a condition report for high-value items.
- Partial: take targeted follow-ups (hardware backs, screw heads, drawer undersides).
- Uncertain: request hands-on inspection from a conservator or specialist.
Limitations
A photograph is rarely definitive for age, authenticity, or value. Many antiques have been repaired, refinished, or assembled from older parts; sympathetic restorations can conceal original joinery. Also, some techniques — like using reclaimed wood or hand-tool finishes on modern reproductions — intentionally mimic older features. Photos of surface details alone cannot always show internal construction, replaced components, or hidden maker stamps.
Market value and provenance require paperwork, auction records, or a physical appraisal. If the object is potentially high-value or destined for sale, rely on a specialist’s written appraisal. Photographs are excellent for narrowing possibilities and identifying clear red flags (modern fasteners, plywood, or mass-produced construction), but they should not be the sole basis for legal, insurance, or estate decisions.
Seek professional confirmation when you encounter: intact maker’s marks associated with major makers, highly unusual construction suggesting rarity, or when planned treatment could affect the item’s value. Conservative conservatorship and professional appraisers can open drawers, remove a single screw for inspection, or test finishes non-destructively to resolve questions a photo cannot.
- Photos help narrow and test hypotheses, but rarely prove age or value alone.
- Hidden repairs, replaced parts, and reclaimed materials limit photographic certainty.
- Get hands-on verification for high-value, rare, or legally consequential items.
Get a first-pass ID with your photos
After photographing the front, back, underside, hardware, joinery, and any maker marks, use the Antique Identifier iOS app to generate targeted matches and refine what to check next. Treat app results as research leads: document supporting photos and follow up with targeted shots or an expert inspection when necessary.
Frequently asked questions
Can one photo identify how old a piece of furniture is?
One well-taken photo can suggest a plausible age range by showing joinery, fasteners, and finish, but it rarely provides a precise year. Multiple photos showing corroborating details — dovetails, screw types, saw marks, and patina in hidden places — increase confidence. For exact dating, a physical inspection and possibly lab tests are necessary.
What joinery should I photograph to help date a drawer?
Photograph the dovetail where the drawer side meets the front, the drawer bottom where it fits into the groove, and the underside of the drawer. Hand-cut dovetails have irregular, asymmetrical pins and tails; machine-cut dovetails are very regular. Also check for saw marks on the drawer bottom (single boards vs sheet panels) to refine a date range.
How can I tell if the hardware is original from a photo?
Look at the screws behind the faceplate, wear patterns where the hardware meets wood, and whether the mounting holes match the piece’s construction. Original hardware often shows consistent corrosion and grime in crevices; replaced hardware may sit above cleaned or patched wood and use modern machine screws or different hole patterns.
Can painted furniture be identified from photos?
Paint hides many clues but not all. Photograph chipped or peeled areas where older layers are exposed, and inspect inside drawers, undersides, and backs where original surfaces may survive. Tool marks, joinery, and construction methods can still be visible under paint and are the best clues for dating painted pieces.