Silver Hallmarks Identification by Photo: Sterling, Plate, Coin Silver, and Maker Marks
Learn how to use photos to narrow silver hallmarks identification by photo, spot plate vs sterling, and prepare the best images for verification.
Quick answer for silver hallmarks identification by photo
A clear photo can often tell you whether a piece is marked sterling, coin silver, or plated, and it can reveal maker marks and assay symbols that point to country and era. For example, a crisp close-up of a '925' or 'STERLING' stamp plus a picture of the whole object helps separate solid silver from plated items and suggests likely origins.
Photos cannot, however, prove purity, weight, or market value on their own. Worn stamps, re-stamped marks, or fake punches can mislead even experienced eyes. Use photography as a triage tool: it narrows candidates and highlights what further testing or expert checks are needed.
Best-case photo evidence includes a readable hallmark, an image of the piece’s unfinished edges or interior seams, and a context shot showing size and typical wear. Those combined images let you assess whether the mark is original, hand-punched, or a later counterfeit.
Treat photographic identification as the first pass. If photos produce a confident match to a known assay office and maker, follow with a non-destructive verification (professional assay or XRF) before accepting purity or value claims.
- Make this section specific to silver hallmarks identification by photo.
- Use concrete examples, not reusable boilerplate.
Photo checklist
To get useful identification results, take four kinds of images: (1) a tight, sharply focused close-up of the hallmark(s); (2) a full view of the object for form and pattern; (3) detail shots of edges, joins, and interiors; and (4) a scale reference such as a ruler or a coin placed beside the hallmark area.
Lighting matters: use diffuse, even light to avoid reflections that wash out tiny punches. Shoot at a slight oblique angle as well as straight-on; angled light can reveal shallow stamped letters or maker punches that a head-on shot hides.
Stabilize the camera—use a tripod or rest your phone on a steady surface—and use the camera’s macro or close-focus mode. If the mark sits in a curved area, photograph both the curve and the flattened face next to it to show how the mark conforms to the surface.
Include images of any interior seams, solder joints, or exposed base metal where wear has removed plating. Those shots are often decisive for separating plated hollowware from solid silver.

- Close-up of hallmark at 1:1 framing and with readable characters
- Full-object photo to show form, pattern, and wear distribution
- Edge/interior shots showing seams, solder, or thin spots
- Scale reference (ruler or common coin) and diffuse lighting
- Multiple angles to catch shallow or skewed punches
Visual clues
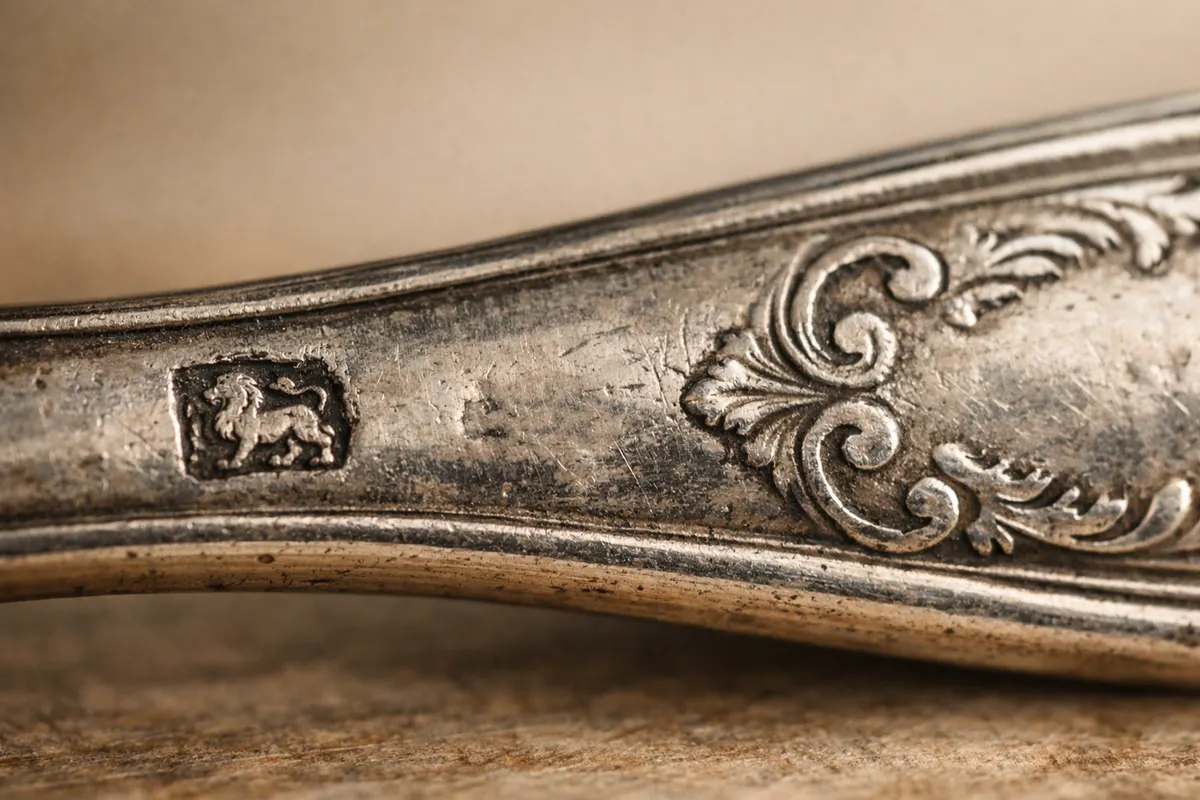
Start with the mark itself: numeric marks like '925' or words like 'STERLING' are straightforward indicators of intended purity. Country assay symbols — for example, the lion passant (England), Minerva head (France), or Federal eagle (United States assay marks vary) — narrow geographic origin and era.
Look at how the mark was applied. Hand-punched marks show irregular depth and slight misalignment between characters. Machine-stamped or laser-engraved marks tend to be uniformly shallow and perfectly aligned; either can be genuine, but hand-punching is more common on older pieces.
Examine edges and high-wear areas. Solid silver will show consistent silver color where wear occurs; plated pieces often reveal a different base metal (copper or brass) at worn edges, thin spots, and solder joints. Green corrosion or red-brown showing through are classic signs of copper base metal beneath plating.
Check construction clues that photos show well: hollowware with side seams and uneven soldering often indicates later manufacturing or repair; cast flatware with sharp pattern lines and little hand-tooling suggests machine-era production. These physical clues help separate likely makers and production dates.
- Text and numeric marks: 925, STERLING, COIN — read literally but verify context
- Assay and city marks: lion passant, Minerva, duty marks — link to origin
- Punch style: hand-punched (variable) vs machine-stamped (uniform)
- Wear patterns: exposed base metal or color change means plating
- Construction: seams, solder, and casting detail point to age and method
Examples by type
Sterling silver: look for '925' or 'STERLING' plus consistent silver color at wear points. A sterling teaspoon typically shows no exposed copper at the bowl rim and has a firm weight for its size. Maker marks often accompany purity stamps on higher-quality items.
Coin silver: commonly stamped with 'Coin' or 'Coin Silver' or marked with an older hallmark system; coin silver items (19th-century U. S. ) can display lighter marks and varying sterility of the punch. Photos that include interior seams and pattern style help place coin silver in the correct century.
Silver plate: common identifiers are faint or poorly aligned 'EPNS', 'EP', 'Silver Plate', or lack of any purity stamp. Photos of edges often reveal a different colored core metal showing through at worn spots, around rims, or near soldered joins.
Maker marks and country-specific examples: American makers often used text marks plus a maker’s monogram; British hallmarks combine multiple symbols (assay office, date letter, sovereign’s head sometimes). A photo showing a sequence of small symbols in a row is typical of British assay systems and helps narrow year and office.
- Sterling: clear '925' or 'STERLING' + consistent wear
- Coin silver: period word marks or older punches + style clues
- Silver plate: 'EPNS', 'Silver Plate', or exposed base metal
- Country marks: sequences of symbols often point to assay office
Compare likely matches
When two candidate identifications look similar, compare multiple clues rather than relying on a single mark. For example, the hanging '925' stamp on inexpensive flatware can be faked; check weight, seam construction, and interior color to confirm solid silver.
If a maker mark matches a known silversmith but the purity mark is ambiguous, check typical maker behaviors: some makers used both 'STERLING' and numeric marks at different times, while others routinely stamped pieces only once. A pattern comparison (ornament style and manufacturing finish) can strengthen or weaken the match.
Separate age from origin by cross-referencing construction and hallmarks. A Victorian-style pattern with machine-pressed floral work plus a modern uniform '925' is likely a later reproduction. Conversely, heavy hand-chased decoration with a small, shallow hand punch suggests authentic older work.
Ask what evidence would overturn a match: visible base metal under wear, modern laser engraving inconsistent with other hand finishes, or a hallmark that sits on a solder joint rather than the original surface are red flags. Identify and photograph any such conflicting clues.
- Compare hallmark style, punch depth, and alignment across photos
- Use weight and edge color to verify claims of '925' or 'STERLING'
- Match pattern and manufacturing finish to the maker’s typical output
- List disqualifying evidence: exposed base metal, modern engraving, inconsistent wear
Common mistakes
Reading worn or partial marks as definitive is a frequent error. A partial 'ST' might be 'STERLING', 'STAINLESS', or part of a maker’s name. Always photograph the surrounding area and seek multiple characters before concluding.
Assuming that any '925' equals high value ignores the fact that many plated items are stamped with misleading numbers or that inexpensive modern imports can be stamped to look older. Look for accompanying maker marks and construction quality.
Mistaking surface color for silver purity—photo lighting, patina, or cleaning can make brass or nickel plate appear silver in images. Include a scale or color reference and shoot under neutral daylight when possible to reduce color-misreading.
Relying on a single close-up without context leads to false matches. A hallmark alone doesn’t show repair history, internal seams, or where the metal has thinned; those physical signs are crucial for telling plated work from solid silver.
- Don’t read partial punches as full identifiers
- Avoid equating '925' visually with intrinsic value
- Beware of lighting or cleaning that disguises base metal
- Never conclude from a single cropped image—context matters
App workflow
Use the Antique Identifier app as a structured second look after you capture the recommended photos: upload the hallmark close-up, full-object shots, edge details, and scale reference within the app’s item report. This helps the app compare marks and form factors against its database and present likely candidates.
When the app suggests matches, review the visual evidence side-by-side: check whether the punch style, sequence of assay marks, and construction cues align. The app is a fast filter that narrows possibilities but not a final authority on purity or market value.
If the app returns a maker name or assay office, capture additional views the app requests—common follow-ups are interior seams, hallmarks on reverse sides, and pattern close-ups. Those extra photos often resolve ambiguous cases or identify later repairs and alterations.
If you’re also working with pottery or ceramics with maker marks, use the related guide on pottery marks identification by photo to see how stamp-reading differs across materials: https://antiqueidentifierbypicture. app/blog/pottery-marks-identification-by-photo
- Make this section specific to silver hallmarks identification by photo.
- Use concrete examples, not reusable boilerplate.
Next steps by confidence level
High confidence: photos show a clear sterling numeric or word mark, consistent wear, and construction matching the maker. Next steps are non-destructive confirmation (professional XRF testing or assay), cataloguing maker and pattern, and if you need value guidance, consulting a specialist or reputable auction records.
Partial confidence: hallmark legible but construction or interior shots raise doubts (thin spots, exposed base metal, or modern solder). Seek higher-resolution photos from alternate angles, ask the app or online communities for corroboration, and consider an in-person inspection before accepting claims.
Low confidence or contradictory evidence: marks are fuzzy, inconsistent with wear, or show possible re-stamping. Do not rely on photo identification for buying or selling at scale. Obtain a professional hands-on assessment, which may include density measurements, acid testing only when acceptable, or XRF analysis for non-destructive alloy reading.
When provenance or legal authentication matters (heirloom attribution, museum submission, or legal dispute), document everything: original photos, date-stamped correspondence, and any professional reports. Photographic identification is part of the record but rarely the final proof.
- Separate high-confidence, partial, and uncertain outcomes.
- Tell the reader when to verify with a trusted source or professional.
Limitations
Photos are inherently limited: they show surface details but cannot measure elemental composition. Do not accept purity, authenticity, or monetary valuation based solely on images. XRF or formal assay is necessary to confirm silver content reliably.
Plating, re-stamping, replacement components, and disguised repairs are common problems that photos sometimes hide. A fake punch can be added to plated items, and some reproductions are intentionally aged to simulate genuine wear; hands-on inspection reveals tool marks and layered construction.
Even with excellent photos, some hallmarks require specialist catalogs or archive research to fully interpret. Date letters, obscure maker marks, and regional assay variations often need a specialist’s reference set or historical context to read correctly.
Use photographic identification responsibly: it guides decisions and helps prioritize in-person verification, but it is not a standalone certificate of purity, maker authenticity, or market value. When in doubt, seek non-destructive testing or an experienced appraiser.
- Separate high-confidence, partial, and uncertain outcomes.
- Tell the reader when to verify with a trusted source or professional.
Try Antique Identifier with clear hallmark photos
Open the Antique Identifier app and add a close-up of the hallmark plus full-object shots, edge details, and a scale reference. The app will compare marks and construction clues to suggest likely matches—use those results as a focused starting point for confirmation and, when needed, professional testing.
Frequently asked questions
How accurate is silver hallmarks identification from photos?
Accuracy depends on photo clarity and the piece’s condition. Well-lit, high-resolution hallmark close-ups combined with full-object and seam photos often produce reliable candidate identifications, but purity and value require non-destructive testing or expert appraisal.
How can I tell plated silver from sterling using only photos?
Look for exposed base metal at worn edges, color differences in high-wear areas, thin spots, and uneven seams. Plate often shows different colored metal where it has rubbed away; sterling will show consistent silver color and a heavier, solid feel for its dimensions.
Can the app identify maker marks and date letters from a single close-up?
The app can suggest makers when hallmarks are clear, but a single close-up is rarely enough. Provide additional shots of the object, interior seams, and pattern so the app can cross-check punch style, placement, and manufacturing details for a stronger match.
What should I do if a hallmark looks like a modern laser-stamp?
Modern laser stamps are typically uniformly shallow and precise. If you see that on a piece that otherwise appears old, document the surrounding finish and construction and seek a hands-on inspection or a non-destructive test to verify authenticity.